Astrophotography on a Shoestring Budget
All photos are © Marshall Faintich
I got my Ph.D. in Astronomy form the University of Illinois at Urbana-Champaign in 1971. I had wanted to work for NASA planning planetary exploration missions, but the Apollo program ended in that same year, and there weren't a lot of opportunities for me. So other than serving on a few NASA working groups, I spent my entire federal and later commercial industry career working with navigation and imaging satellites. I got involved with digital imaging as early as 1973, and in 1976 was writing computer mainframe code to process NASA imagery of Mars. My love of astronomy continued, but I had little opportunity to pursue it.
In the mid-1980s, I bought a used Celestron-8 telescope, and got hooked on astrophotography as a hobby. I bought all kinds on filters and imaging components for my film-based cameras, and built a guide scope using a cheap refractor and an illuminated eyepiece reticle. With slow motion controls, I could take 4 to 15 minute exposures of deep sky objects with ISO 3200 film, and planetary photos using eyepiece projection yielding an effective 16,000mm lens. My telescope and camera equipment weighed 50+ pounds, and I needed 150 feet of extension cords to reach an outlet for my telescope drive. I was happy with my results until . . .

Orion Nebula
30 Jan 1989; 1250mm; f/6.3, ISO 3200 film; 4 minute exposure
| | |
The Hubble Space Telescope was launched in 1990, and after a couple of years seeing all the marvelous images it produced, all of the astrophotography work I was doing seemed to be of so little consequence that I wondered why I was putting in all that effort for such poor results. I dabbled a bit with this hobby now and then after that, but was more interested in taking occasional astrophotos when I had the chance to see an eclipse or a bright comet.
I packed up my scope and equipment in 1997, and didn't take it out again. At the end of 2006, I got hooked on digital wildlife photography, and started getting some really good results. One of the software tools I bought was FocusMagic, that not only did a great job of sharpening my photos, but it could also remove a small amount of subject motion blur. But I kept seeing amateur astrophotos taken with digital cameras, and the thought of trying again remained in the back of my mind.
In 2015, I sold my telescope and all of my add-on equipment. I didn't get very much for all of this equipment, but it did help to offset some of the costs for my wildlife photography camera bodies and lenses. In early 2020, I decided to see what my then current camera equipment could do. I was limited to fairly short exposures at high ISO so that there wouldn't be significant star trailing because of the earth's rotation. I soon hit the limit of what I could achieve without getting some new gear.
But I didn't want to buy another telescope and all the add-ons I would need. I could have afforded to do so, but I really wanted to try photographing only a few deep sky objects, and at the age of 73, didn't know how many more years I would be doing this again, didn't want to lug heavy equipment around, and no longer had the desire to wake up in the middle of the night to capture a deep sky object.
So I needed a solution that matched what I wanted to do. I purchased a Star Adventurer unit that I could mount on the sturdy tripod I already had, and could use my Canon 7D Mark II camera bodies and lenses I had for wildlife photography. This unit could track deep sky objects to counter the earth's rotation. But I still had some issues I needed to resolve.
The first issue was good polar alignment of the axis of the star tracker. The unit has a polar scope that is used for this task, but it's not as easy as it might seem. First of all, the star tracker unit has a red light to illuminate the polar reticle, but it isn't internal to the unit and is a bit of a pain. Also, it's hard to bend down low enough to look through the polar scope to get Polaris in the proper orientation. So I developed a series of steps to make this task a lot easier.
First, I rest my iPhone on top of the star tracker battery component, and use the iPhone's compass app to roughly align the tripod to true north (not magnetic north - needs to be changed in iPhone settings). Note that the star tracker batteries and camera should be turned off now, as battery current can create a magnetic field.
Next, I use the Polar Scope Align Pro app in daytime alignment mode to refine the tripod azimuth alignment and wedge elevation.
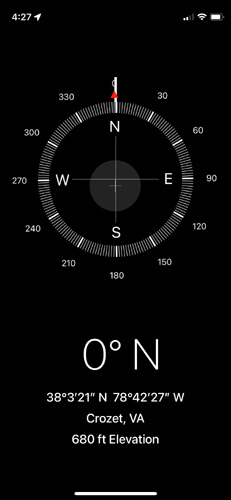
iPhone internal compass
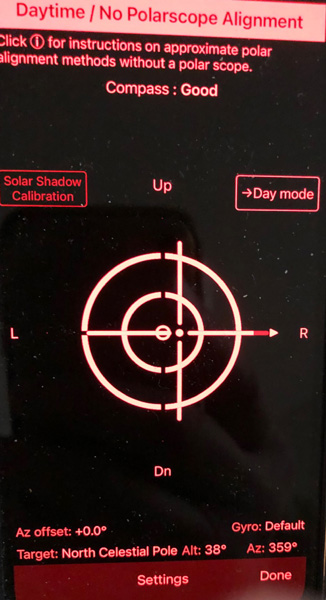
Polar Scope Align Pro app
| | | |
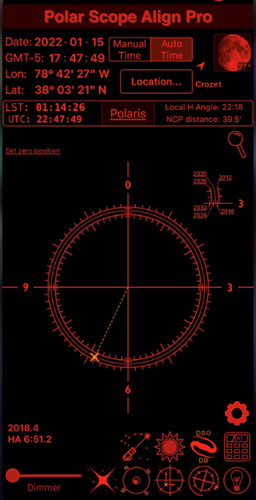
Polar Scope Align Pro app
Now comes the tricky part. I needed to bend down and further adjust the azimuth and elevation to get Polaris on the correct location on the reticle as shown in the Polar Scope Align Pro app. I had a really hard time doing this, so I bought a right angle viewer for my camera, and decided to try it with the polar alignment scope. But how could I attach it to the scope?
| | |
I could have bought a fairly expensive coupler, but easily made one using a plastic pill bottle of about the correct diameter and some felt to keep it secure and easy to slide on and off.
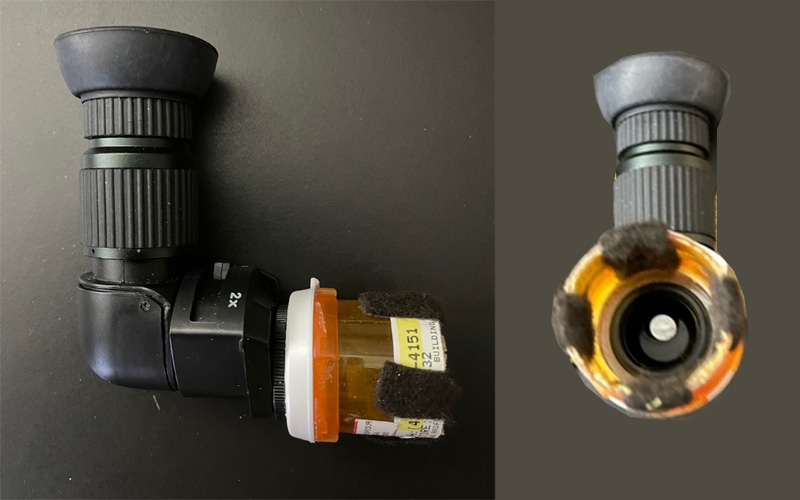
Right angle viewer and homemade attacher
With the star tracker properly polar aligned, I now attach my camera to the unit, and manually focus the camera on a bright star or planet using Live View at 10x. Now the tricky part is getting the camera on a deep sky object that I cannot see with my naked eye. In my telescope astrophotography days, I used the setting circles to get the scope on a deep sky object, and modern telescopes have software that does it for you automatically. But the Star Adventure doesn't have either option.
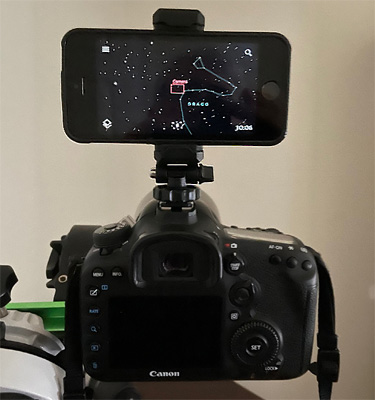
But I figured that out as well. I used an inexpensive iPhone adapter to attach an older iPhone to the hot shoe of my camera. I use the Stellarium iPhone app in real time to align the camera on the deep sky object. It really helps to input the camera field of view in the Stellarium app and move the camera until the deep sky object is inside the box on the Stellarium app screen. Again, it helps to do this with the camera and star tracker turned off, and then turn both of them on after getting the camera on the deep sky object. Rechecking polar alignment after getting the camera on target is worthwhile.
Deep Sky Finder
| | |
Well, all of this worked fairly well, with a couple of caveats. First of all, the star tracker has a little play in its mechanism, and polar alignment can be off a bit. Both of these issues can cause minor star trailing. I live in a Bortle 4+ area, and am limited to about a 2 minute exposure at f/2.8 and ISO 1600 before light pollution overpowers the images. Exposing longer than that just seems to shift the entire histogram to the right without adding much more deep sky detail, but I can take multiple exposures and stack them, either manually or automatically with software, to enhance deep sky detail and reduce image noise.
So, how can I eliminate residual star trailing? One option is to spend a few hundred dollars to buy an auto-guider that connects to the Star Adventurer to maintain star positions in the image, but only in the right ascension direction. Stellar image drift in the declination direction cannot be improved with an auto-guider with this unit. And an auto-guider also needs to have either a laptop (or Wifi smartphone) connected to run the auto-guider software. Instead, I chose to use a software tool that I already had, and remove residual star trails in post-processing. While this approach is not as good as using an auto-guider, it seems to work well enough for me, and can correct star trailing in both directions. Recall that I mentioned that FocusMagic has a feature to correct subject motion blur. This seems to work well for subject motion blur up to about 7 or 8 pixels. If I have residual star trails that are greater than this, I can reduce the image size by a factor of 2 or 3 before using this FocusMagic feature. Of course, reducing the image size loses image detail, but that detail is blurred anyway. FocusMagic allows you to manually input the direction of star trailing and the length of the trails. It does not correct star trailing so bad that there is obvious curvature in the star trails.
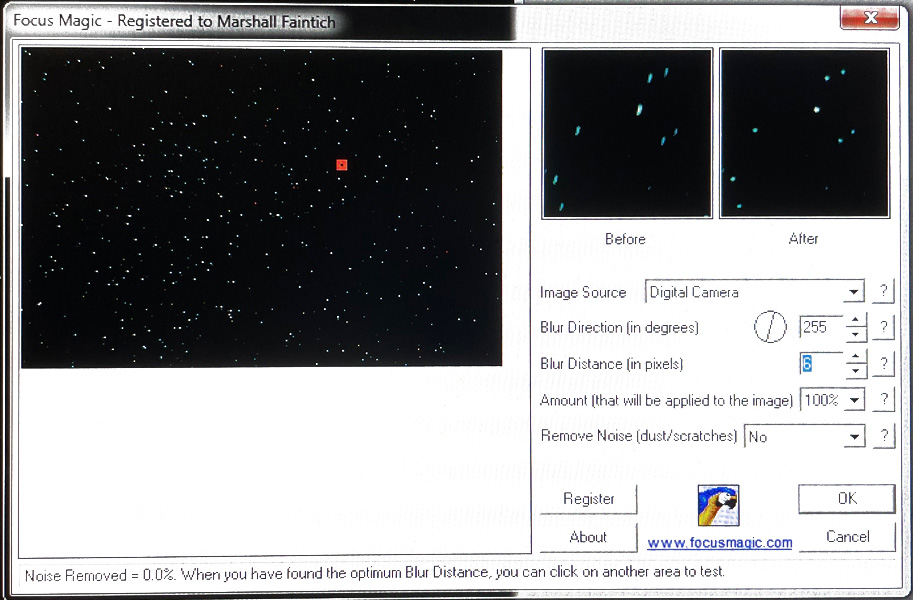
Removing residual star trails
I convert each raw image to either 8 or 16 bit TIFF, and then apply subject blur correction to each image before stacking, as the residual star trailing can vary in direction and length on each image.
The second problem I have worked on is reducing the effects of light pollution. I purchased an Astronomik CLS light pollution filter that clips into my camera body so that I can change lenses without having to change the CLS filter.
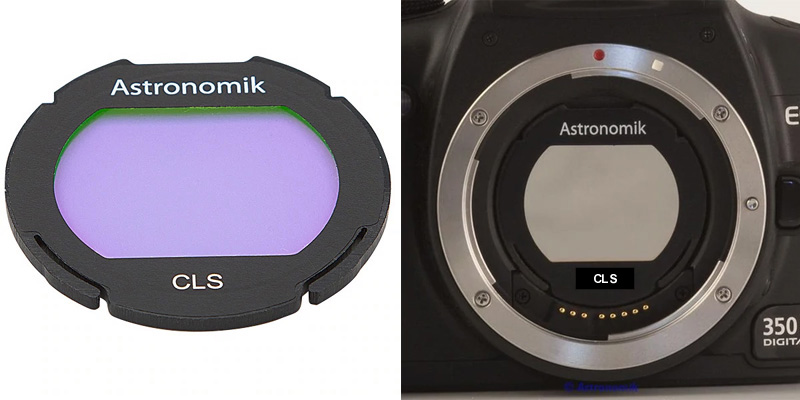
Clip-in light pollution filter
One problem with this filter is that it results in a very blue sky image. I can correct most of the color shift by taking a photo of a white sheet of paper under noon sunlight, and then using this image to assign a custom white balance, either in the camera or in post-processing, to correct most of the color shift. The remaining color shift is easily corrected in post-processing. Here are three photos: (left) original image; (middle) white paper image; (right) original image with custom white balance applied.
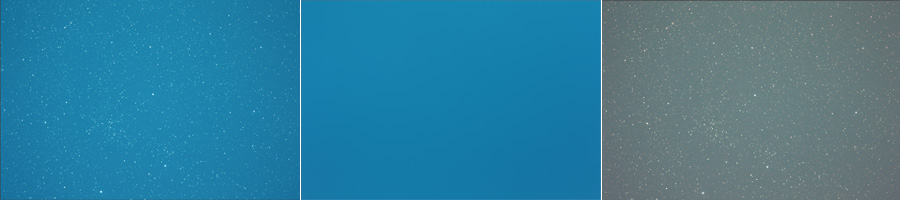
Custom White Balance
Using these techniques, I have had fairly good results with my Canon 50mm f/1.4 lens at f/2.8, my Canon 200mm f/2.8 lens at f/2.8, and my 400mm lens at f/5.6; all at ISO 800 to 3200 with exposures from about 30 seconds to 2 minutes. I found that taking flat and dark frames were not necessary. These exposure times yielded histograms near the middle, and post-processing to darken the background sky eliminated most, if not all, of the camera sensor noise. The 50mm lens at f/2.8 had uniform exposure across the entire image, and if I want to use the entire 200mm or 400mm image, the Canon DPP software does a fairly good job of correcting peripheral illumination if I check that box on an image. The only poor results I have had are when my polar alignment was off, if my manual focusing was not sharp, or if I couldn't find the deep sky target (usually before my Stellarium fix).
Here's what my setup looks like. The only addition is a remote shutter control cable that I double click for each exposure. The first click is to lock up the mirror. Note the small silver colored weight on the fine-tuning mounting assembly on the other end from where the camera is attached. I kept my balance weights from my old Celestron-8, and can add as many weights that I need to balance the camera. The rest of the weights that I do not use are in a bag that I hang on the tripod to help steady it.

My astrophotography setup
I am happy with these results, and I hope that some of these tips will be useful for you.
Click here to see of my film-based and digital astrophotos.